05 November 2012

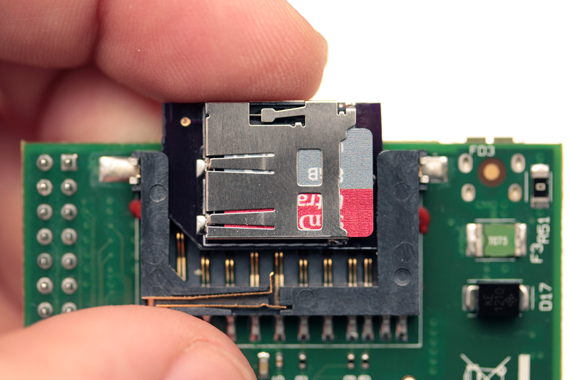
Low Profile SD to MicroSD Adapter for Raspberry Pi


Here's something I've been looking for.  This permits you to use a microsd card on the PI and also eliminates the SD card sticking out of the back past the pc board.  


Unfortunately the shipping at MCMElectronics is silly - so this device costs 9 bucks to ship which makes it impracticsl =(

When I get this sorted out I'll post it.

01 November 2012


The absolute best arcade game controller in the world.

If you haven't already met it, I'd like to introduce you to the best arcade controller in the world.  I've had mine for well over 15 years and it's going strong.  Not a single switch broken, and I angrily pound the crap out of it.
X-Arcade Tankstick + Trackball Photo


X-Arcade Tankstick + Trackball


This controller has everything you ever need to run MAME and run it like a pro.  Don't know what MAME is?  Why, please step over here.


30 October 2012

I've ordered an "RSMMC" card from MemoryTen to use as a boot loader for my raspi.  It's 128megs and a slightly different format than the memory that is usually used on raspberry pi - so there is some experimentation to do to see if this will work to boot my pi. It was 5 bucks, so not a huge loss if it doesn't turn out to work.

 256MB RSMMC Flash with MMC Adapter (p/n RSMMC-256MB)
All I intend to store on it is the /boot partition, with a cmdline.txt that points to my actual root drive.  In my case, my pi uses a USB HD as the primary drive so my cmdline.txt looks like :

dwc_otg.lpm_enable=0 console=ttyAMA0,115200 kgdboc=ttyAMA0,115200 console=tty1 r
oot=/dev/sda3 rootfstype=ext4 elevator=deadline rootwait

The important to notice change here is "root=/dev/sda3" - or the third partition on my USB Hard drive.  I have reserved a boot partition and I use /dev/sda2 as swap.

With this configuration, the only thing my raspi uses the SD card for is load the bootcode and kernel, and then mounts my USB HD as the root drive.


I've found a perfect solution to the half length mounts for a boot device for the raspi.


Norcent microSD Trio Memory Card w/USB/SD Adapter

 
If you notice, it has a perfect half-length microSD adapter with a usb 'tail' which can be safely removed, leaving us with only a tidy half-length SD adapter.  Now the only problem is finding one, as they seem to be sold out everywhere.

Once I get my hands on one I'll document my modifications.


26 October 2012

I'm always looking for self-powered, very small form factor USB hubs that I can jam into a housing with the raspi.  This post is intended to be a collection of some of the more interesting ones I discover.

This is the NZXT IU01, which is a bareboard USB hub with 6 'internal' connectors.  These internal connectors are useful because they can be broken out with standard PC front panel USB connectors to permit mounting external USB ports on an enclosure.  USB ports mounted on an enclosure are considerably more rugged than USB ports directly on the board, as damage would be limited to the connector and not potentially the controller PCB.
NZXT IU01 Internal USB Hub

NZXT IU01 Internal USB Hub [IU01]


25 October 2012

I stumbled across this article while looking for a mini USB hub that I could disassemble for the power for my raspberry pi.  In it, the author has done pretty much what I'm considering doing which is to reduce the resistance on the incoming power connector, and make a better connection to power for the raspberry pi as well as power the whole kit via a powered USB hub with ~2A PSU.

The basic theory here is that he has unsoldered the power input usb thus :

USB jack removed.JPG

and then soldered a connector directly from his raspi to the USB hub :

hardwired ports.JPG

The idea then is to use a very small form factor USB hub with a decent power supply like the VAKOSS 4-port which can be dismantled :

USB Hub

... and wire the raspi directly to the hub, eliminating resistance from the microjack.  The other improvement is that all of the power in the system (keyboard, mouse, USB HD, etc.) all now come from the usb hub, rather than passing through the raspi.

Happy hacking!


One of my raspis is intended to be an electronics experiment, using the logic from the pi to manipulate TTL.  Towards that end I am looking for some tools that help that kind of experimentation, and I've found these things :


Cover with Breadboard Area for Raspberry Pi - Large


Once you have that together, you'll need a breakout cable for the raspi - like this :

RPi_Breadboard_Adapter_with_RPi.jpg


How to make a breakout adapter (instructibles.com)


Or alternately you can buy one from adafruit.com :
Adafruit Pi Cobbler Breakout Kit for Raspberry PiAdafruit Pi Cobbler Breakout Kit for Raspberry Pi

Adafruit Pi Cobbler Breakout Kit for Raspberry Pi

Adafruit Pi Cobbler Breakout Kit for Raspberry Pi 


To wrap it all up - let me present to you a simple project put together by the good folks at liminastudio.com.


Tutorial: How to use your Raspberry Pi like an Arduino


Until next time kids, happy hacking and remember - you don't stop playing because you get old, you get old because you stop playing.


As I mentioned earlier, my preferred setup for the raspi is to have a very small boot-only halfsize card in the SD slot and a usb hard drive.  To that end, I'm looking for the best USB hard drive for my purposes and I think I may have found it here:

Digital 500GB External USB 2.5\" Mini Portable Hard Drive

Digital 500GB External USB 2.5" Mini Portable Hard Drive


It's powered by the usb 2.0 port, and uses a mini connector and not a custom connector.  The case is aluminum, which will transfer heat appropriately as well.

The most sensible application here would be to power the raspi and the drive from a nice powered USB hub.  I'll let you know when I find the right one.


24 October 2012

I've decided that my preferred storage configuration for the raspi is to have a very small sd card and root/everything else on usb.  This has several advantages for me :

1) Large storage is cheaper on usb
2) USB is more portable, and I can read it from a VM (where I have had some issues reading built-in SD card from VMs)
3) I can reimage an sdcard without losing my data if /boot is all I store on it
4) it's easy to keep a working fallback kernel on a 512M boot sdcard.
5) I don't like the SD card sticking out the way it does - so I am investigating using RSMMC (this for example) but they are notoriously slow.

Other half-length card ideas include this half length adapter from ADAFruit and the card adapter from quilix which both seem very promising.


23 October 2012

This is fairly well hidden in the raspberry pi world, but if you want to update your firmware and kernel on the raspberry pi, you will want to install rpi-update and to follow the instructions there to update your raspi kernel and firmware.


One of the things I've run into with the cloned images on the raspberry pi is the classic linux eth0 issue with udev.

Linux tries to keep devices in order by remembering their physical address - which causes problems when you move an image from one hardware to another.

The best solution I have found is to build the clone master image using eth9, with dhcp and the clone master's MAC address.  That way, when the system is cloned it creates eth0 on the new platform without any stupid jiggling of the udev network persist rules and reboots.

This works for VMWare clones as well, and saves a little time.


I just got my raspberry pi, and I'm very pleased.  It works, and works well - I've managed to get MAME going on it (with help from this post), and am using it for xterms and whatnot.

Cheap thrills for the geek set.

I'm also delighted as punch that some of my past acquaintances are involved in it,  I've seen a few names I recognize in the source code (shout out to Mike Thompson).

There are a few things I've picked up that I need a place to jot down about the Pi and about other things that are really based on technology and my interests in it and this is the place that I'm going to be keeping those little details recorded.